
Skin Tags and Home Remedies: What You Should Know
1. What Are Skin Tags?
Skin tags are small, soft, noncancerous growths that commonly develop where skin rubs against skin or clothing. They often appear on the neck, under the arms, eyelids, groin, or other skin folds. Although they are usually harmless, some people choose to have them removed for comfort or cosmetic reasons.
Key points:
- Soft, flesh-colored or slightly darker growths
- Usually painless
- Common on the neck, underarms, eyelids, and skin folds
- Often linked to friction, genetics, age, or body weight
- Only a healthcare professional can confirm that a growth is a skin tag
2. Why Do People Search for Home Remedies?
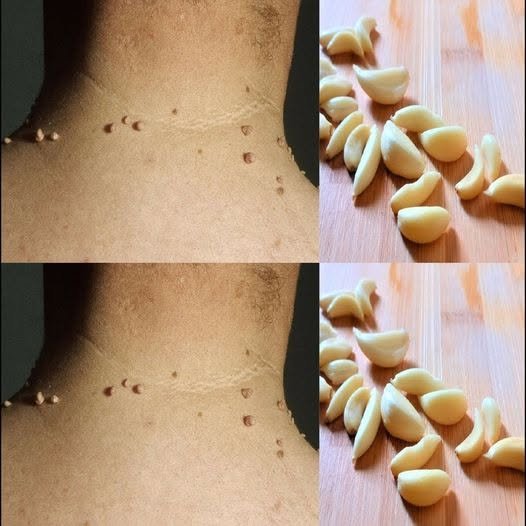
Because skin tags are so common, many DIY removal methods are shared online. One frequently discussed remedy involves using household ingredients such as garlic, apple cider vinegar, or tea tree oil.
However, there is limited scientific evidence that these home remedies are safe or effective for removing skin tags.
Things to consider before trying DIY methods:
- Results vary from person to person.
- Natural ingredients can still irritate the skin.
- Attempting to remove a skin tag yourself may cause bleeding, infection, or scarring.
- Online photos and testimonials are not medical proof.
Professional evaluation is always the safest option.
3. When Should You See a Dermatologist?
Most skin tags do not require treatment, but some situations should be evaluated by a healthcare provider.
See a dermatologist if:
- The growth changes in color, size, or shape.
- It becomes painful or starts bleeding.
- It frequently catches on clothing or jewelry.
- You are unsure whether it is actually a skin tag.
- You want safe removal for cosmetic or comfort reasons.
A dermatologist can determine whether the growth is harmless or needs further examination.
4. Tips for Maintaining Healthy Skin
Good skincare habits can help reduce irritation and support overall skin health.
Daily skincare tips:
- Keep skin clean and dry.
- Reduce friction by wearing comfortable clothing.
- Moisturize dry skin regularly.
- Protect your skin from excessive sun exposure.
- Avoid pulling, cutting, or picking at skin growths.
- Schedule regular skin examinations if you notice changes.
Healthy skin habits can improve comfort and help you notice new skin changes early.
5. Professional Treatment Options
If removal is recommended, healthcare professionals have several safe treatment methods available.
A dermatologist may recommend:
- Cryotherapy (freezing the skin tag)
- Electrocautery (using heat to remove the growth)
- Minor surgical removal
- Examination to rule out other skin conditions
These procedures are generally quick and performed under appropriate medical care.
6. Final Thoughts
Skin tags are very common and are usually harmless. Although home remedies are frequently shared on social media, they are not guaranteed to work and may cause skin irritation or other complications.
If you have concerns about a skin growth or would like it removed, the safest approach is to consult a licensed dermatologist or healthcare provider. Professional evaluation helps ensure an accurate diagnosis and appropriate treatment.
Disclaimer: This article is for general educational purposes only and should not be considered medical advice. Always consult a qualified healthcare professional before attempting to remove any skin growth or trying home remedies.